Anaplan Connect Quick Start Guide - Windows Installation


This Anaplan Connect Quick Start guide is specifically for the Microsoft Windows platform. Its purpose is to help you swiftly set up and get started with Anaplan Connect. Please follow the steps below to guide you through the installation process. If you are utilizing macOS, kindly refer to theAnaplan Connect Quickstart for macOS.
Step #1: Check to see if Java is installed.
- In your Microsoft Windows environment, open a Windows Command Prompt (cmd.exe) and enter the following:
java -version - If you receive a similar message, then Java is not installed.

- Please proceed to Step #2
Step #2: Install Java (via automatic installer)
- Open the URL:https://www.azul.com/downloads/
- Please note the following:
- The browser will detect your operating system and try to download the latest version of Azul Open JDK (Java Development Kit). At the time this article was published, the latest version is 17.0.7.
- The downloaded file will be a Microsoft Software Installer (MSI) file that will need to be run.
- Run the downloaded MSI file. Note that you may require administrative privileges in order to install the file. If you cannot install it, please follow the instructions in the next section,第三步:安装Java(通过手工deployment).
- An Installation Wizard will start displaying the following (or similar screens):
- Launch Azul Zule JDK Installer

- Accept the default.

- Select "Yes".

- Wait until the installation is complete.

- Confirm that the installation completed successfully

- Launch Azul Zule JDK Installer
- Assuming the installation was successful, open anewWindows Command Prompt (cmd.exe) and enter the following:
java -version
If the installation is successful, the following will appear:
- Open the Windows File Explorer and navigate to the drive letter “C:\”.
- Create a new directory called “automation” just under the C Drive.
Note: If preferable, this can be done in another drive or location, but please substitute your location with the locations in these instructions.
第三步:安装Java(通过手工deployment)
- Open the URL:https://adoptium.net/temurin/releases/
- Select the following:
- Operating System: Windows
- Architecture: x64
- Package Type: JRE
- Version: 17
- Download the “.zip” file.

- Open the Windows File Explorer and navigate to the “C:\”.
- Create a new directory called “automation” just under the C Drive.
Note: If preferable, this can be done in another drive or location, but please substitute your location with the locations in these instructions. - Create a new directory under “automation” called “java” and move the downloaded file to this location.

- Right-click on the file and choose “Extract All”.

- 接受默认位置提取文件。

- Once the extraction is complete, navigate to where the “java.exe” is located.
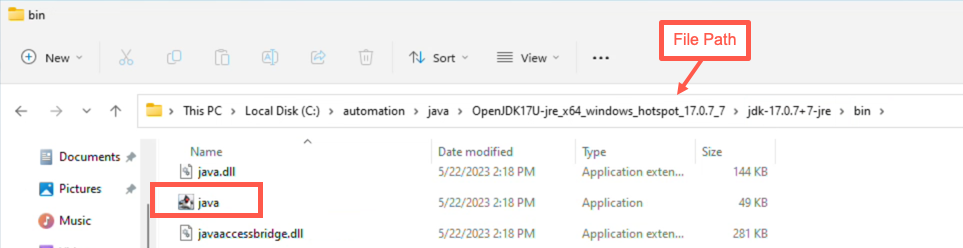
- Click in the File Path and copy the full path to the clipboard.

- Open anewWindows Command Prompt (cmd.exe) and change the directory to the location where the “java.exe” is located. This can easily be done by typing
cdand pasting it from the file path saved in the clipboard.
- Enter the following to check if Java launches correctly:
java -version - If the manual deployment was successful, the following will appear:

Step #4: Download and Deploy Anaplan Connect
- Open the URL:
- Scroll to the section “Anaplan Connect (API client)” and download the “Latest” release. Optionally, download the corresponding User Guide.
- Move the file “anaplan_connect_4.2.1.zip” (this version may vary) under a new directory named “anaplan-connect” under the “automation” directory.
- Right-click on the file “anaplan_connect_4.2.1.zip” and choose “Extract All”.
- Accept the default location to extract the files:

- Once the extraction is complete, navigate to where the “AnaplanClient.bat” is located.

- Click in the File Path and copy the full path to the clipboard.
- Open a Windows Command Prompt (cmd.exe) and change the directory to the location where the “AnaplanClient.bat” is located. This can easily be done by typing
cdand then pasting it from the file path saved in the clipboard. - If you had to install Java via the manual deployment, then the following extra step is required:
- From the Command prompt, type in:
notepad.exe AnaplanClient.bat - Edit the line starting with
set JAVA=and add the full path to the “java.exe” file. Please be sure to include thejava.exein the path like the following example:
- Save the edited file and close Notepad.
- From the Command prompt, type in:
- Check if Anaplan Connect is successfully deployed. At the Command Prompt, ensure you are in the directory
c:\automation\anaplan-connect\anaplan_connect_4.2.1and type inAnaplanClient.bat - If the following is returned, then Anaplan Connect was successfully deployed:

Author: Quin Eddy,@QuinE- Director of Data Integration, Operational Excellence Group (OEG)
Comments
-

Aw, c'mon! Where's the challenge if you're going to lay it all out so clearly? Seriously, tho, I'm very pleased to see some more guidance on successfully setting up AnaplanConnect!
One helpful tip to get to an admin version of the command window is to right-click on the command prompt app and select run as administrator. That gets you out of the default "user" profile part of the server's directory structure and into the system area, which a user will need to get this all working properly.
Also, this article is a good resource for anyone implementing AnaplanConnect (IMHO). It's for a prior version of AnaplanConnect, but the base concepts still apply:
 <\/img><\/em><\/p>\n
Please note that this article is specific to an MS Windows Server implementation with a CA Certificate and uses Windows Batch Scripting file commands. A good reference for Windows Batch Scripting commands can be found here: https:\/\/en.wikibooks.org\/wiki\/Windows_Batch_Scripting<\/a><\/em><\/p>\n
So, you’ve had your Anaplan environment up and running for a while and your end users are excited. They have asked for more and more functionality and you’ve given it to them—but all of the integrations are manually run on a daily, weekly, monthly, etc. cadence. The users are asking for help streamlining the process and inquiring about if automation is possible—automation of source data in, automation of model-to-model data sharing, automation of budgeting and forecasting data out (for external reporting or even back to your GL system). <\/p>\n
Good news! It is possible, and you have been tasked with setting up these integrations! Your organization does not have Cloud options for which Anaplan has connectors (Dell Boomi, Informatica, Mulesoft, etc.), but you can work with your internal IT team members to accomplish your task using AnaplanConnect<\/a>. You’ll need a server to run the processes, access to a scheduling tool, and some team members in IT to ensure data is staged between systems appropriately. <\/p>\n
As you go through the documentation and create some test scripts in your UAT environment, you’ve got things working. You’ve followed the examples and created a parameter section at the top of each script for the integration user account\/certificate credentials, the workspace ID, the model ID, etc.<\/p>\n
The thing is, your Anaplan landscape is getting big. You’ve got a Development, UAT, and Production environment and multiple live models. You’ve got ALM (mostly) implemented between UAT and Prod, but the new AnaplanConnect v. 1.4.x paradigm requires the 32-character workspace and model ID’s to be present (and correct) within each script, and you can no longer just use the workspace and model names (like in AnaplanConnect v. 1.3). Therefore, even if the Prod and UAT models are named the same, the scripts must uniquely identify them with the 32-character ID. <\/p>\n
How do you manage this? How do you successfully migrate these scripts between UAT and Prod without typos or copy\/paste issues? Could you even tell what workspace or model the script is actually running against without some kind of lookup key? What to do? <\/p>\n
Introducing: The Configuration File<\/h2>\n
Just like most applications have a file (or two) of common parameters used across the platform, you can create a configuration file specific to the AnaplanConnect parameters needed from your organization’s Anaplan Platform!<\/p>\n
What Kind of Parameters Can I Define Centrally in My Config File?<\/h2>\n
Any commonly used setting in your scripts can be centrally defined and managed in your Config file. Examples are:<\/p>\n
- Authentication parameters (unsecured user account or CA Cert).<\/li>\n
- Workspace ID.<\/li>\n
- Model ID.<\/li>\n
- Source data (import) directory paths.<\/li>\n
- Export data directory paths.<\/li>\n
- Import error (dump) log file directory paths.<\/li>\n
- Standard export or error log file names (with date stamp if you want to get fancy).<\/li>\n<\/ul>
What Would an Example Configuration File Look Like?<\/h2>\n
Please see the file attachment for this article.<\/p>\n
How Does This Work?<\/h2>\n
Depending on how you organize, nest, or schedule your scripts, be sure to include a command to call the configuration file (where all the common parameters are defined) prior to defining or running the AnaplanConnect operation in the script. <\/p>\n
In each script, where you would have explicitly defined the parameter (like ModelID), simply reference the parameter name in your Config file. For example, I have a model called “HUB”. Previously in my scripts, I just defined the ModelID =”HUB” for each operation. Since that no longer works, and 32-character alpha-numeric names are not my thing, I reference the parameter that I named “HUB” in my Config file. <\/p>\n
In the Config file:<\/p>\n
 <\/img><\/p>\n
<\/p>\n
<\/p>\n
In the AnaplanConnect script:<\/p>\n
<\/p>\n
 <\/img><\/p>\n
<\/p>\n
<\/p>\n
This %HUB%<\/strong> parameter is read into memory when the Config file is executed and is available to the AnaplanConnect script for use when needed.<\/p>\n
What if My Organization Has Multiple Production (or UAT) Workspaces? <\/h2>\n
You’ll need to have a configuration file for each workspace that contains information specific to that workspace but can include common server-level information (like extract file path or import file path) that may remain the same throughout the Prod\/UAT\/Dev instances. Just organize the scripts based on where the model exists and make sure the appropriate configuration file version is called as part of the execution process.<\/p>\n
Can This Help Improve My Testing?<\/h2>\n
As part of the default example scripts provided in the manual, there is a “Pause” command at the conclusion of the execution section (“Do not edit anything below this line”). By replacing that “Pause” command with an ‘if’ statement and including a definition around whether or not you desire the “Pause” script command to be in effect, you can easily have your scripts in “debug” mode or “production run” mode. <\/p>\n
First, replace that “pause” in the execution section of the script with a line that says,<\/p>\n
 <\/img><\/p>\n
<\/p>\n
<\/p>\n
Then, you can control this behavior from the configuration file instead of within each script. Add a couple of lines to the configuration file and comment out the state you don’t want (below shows “debug mode” – pause set TRUE). <\/p>\n
 <\/img><\/p>\n
<\/p>\n
<\/p>\n
Now I’m sure you’re wondering, “Are there more things I can do to streamline my scripts?” The answer is YES. But, those are for you to noodle on and figure out, depending on the needs of your organization. Happy noodling!<\/p>\n
What do you think about AnaplanConnect? Let us know in the comments below. <\/strong><\/p>\n
<\/hr> <\/img>Master Anaplanner Stacey Gibbens<\/a>, PMP is a Senior Financial Systems Analyst with Simon Property Group. In this role, Stacey manages a suite of financial applications (including Anaplan), wearing any one of several hats depending on the situation and customer in question. This includes project management, application development, systems integrations, and expert-level troubleshooting. <\/p>\n
Stacey understands that any information system is only as good as its user interfaces and data flows. Since implementation in 2015, the footprint of Simon’s Anaplan environment has grown from one production workspace comprised of a Data HUB, a Security model, and 5 user models to FOUR production workspaces, comprised of two Data HUBs, a Security model, and 14 user models.<\/p>\n
She and her team have been able to leverage the straightforward Anaplan user interfaces, along with AnaplanConnect, scheduling tools, and a data warehouse, to reduce errors and eliminate duplicative data entry between multiple related (but stand-alone) applications as well as produce external, highly formatted Cognos reporting.<\/p>","bodyRaw":"
<\/span><\/EM><\/P>\nPlease note that this article is specific to an MS Windows Server implementation with a CA Certificate and uses Windows Batch Scripting file commands. A good reference for Windows Batch Scripting commands can be found here: https:\/\/en.wikibooks.org\/wiki\/Windows_Batch_Scripting<\/A><\/EM><\/P>\n
So, you’ve had your Anaplan environment up and running for a while and your end users are excited. They have asked for more and more functionality and you’ve given it to them—but all of the integrations are manually run on a daily, weekly, monthly, etc. cadence. The users are asking for help streamlining the process and inquiring about if automation is possible—automation of source data in, automation of model-to-model data sharing, automation of budgeting and forecasting data out (for external reporting or even back to your GL system). <\/P>\n
Good news! It is possible, and you have been tasked with setting up these integrations! Your organization does not have Cloud options for which Anaplan has connectors (Dell Boomi, Informatica, Mulesoft, etc.), but you can work with your internal IT team members to accomplish your task using AnaplanConnect<\/A>. You’ll need a server to run the processes, access to a scheduling tool, and some team members in IT to ensure data is staged between systems appropriately. <\/P>\n
As you go through the documentation and create some test scripts in your UAT environment, you’ve got things working. You’ve followed the examples and created a parameter section at the top of each script for the integration user account\/certificate credentials, the workspace ID, the model ID, etc.<\/P>\n
The thing is, your Anaplan landscape is getting big. You’ve got a Development, UAT, and Production environment and multiple live models. You’ve got ALM (mostly) implemented between UAT and Prod, but the new AnaplanConnect v. 1.4.x paradigm requires the 32-character workspace and model ID’s to be present (and correct) within each script, and you can no longer just use the workspace and model names (like in AnaplanConnect v. 1.3). Therefore, even if the Prod and UAT models are named the same, the scripts must uniquely identify them with the 32-character ID. <\/P>\n
How do you manage this? How do you successfully migrate these scripts between UAT and Prod without typos or copy\/paste issues? Could you even tell what workspace or model the script is actually running against without some kind of lookup key? What to do? <\/P>\n
Introducing: The Configuration File<\/H2>\n
Just like most applications have a file (or two) of common parameters used across the platform, you can create a configuration file specific to the AnaplanConnect parameters needed from your organization’s Anaplan Platform!<\/P>\n
What Kind of Parameters Can I Define Centrally in My Config File?<\/H2>\n
Any commonly used setting in your scripts can be centrally defined and managed in your Config file. Examples are:<\/P>\n
- \n
- Authentication parameters (unsecured user account or CA Cert).<\/LI>\n
- Workspace ID.<\/LI>\n
- Model ID.<\/LI>\n
- Source data (import) directory paths.<\/LI>\n
- Export data directory paths.<\/LI>\n
- Import error (dump) log file directory paths.<\/LI>\n
- Standard export or error log file names (with date stamp if you want to get fancy).<\/LI>\n<\/UL>\n
What Would an Example Configuration File Look Like?<\/H2>\n
Please see the file attachment for this article.<\/P>\n
How Does This Work?<\/H2>\n
Depending on how you organize, nest, or schedule your scripts, be sure to include a command to call the configuration file (where all the common parameters are defined) prior to defining or running the AnaplanConnect operation in the script. <\/P>\n
In each script, where you would have explicitly defined the parameter (like ModelID), simply reference the parameter name in your Config file. For example, I have a model called “HUB”. Previously in my scripts, I just defined the ModelID =”HUB” for each operation. Since that no longer works, and 32-character alpha-numeric names are not my thing, I reference the parameter that I named “HUB” in my Config file. <\/P>\n
In the Config file:<\/P>\n
<\/span><\/P>\n<\/P>\n
<\/P>\n
In the AnaplanConnect script:<\/P>\n
<\/P>\n
<\/span><\/P>\n<\/P>\n
<\/P>\n
This %HUB%<\/STRONG> parameter is read into memory when the Config file is executed and is available to the AnaplanConnect script for use when needed.<\/P>\n
What if My Organization Has Multiple Production (or UAT) Workspaces? <\/H2>\n
You’ll need to have a configuration file for each workspace that contains information specific to that workspace but can include common server-level information (like extract file path or import file path) that may remain the same throughout the Prod\/UAT\/Dev instances. Just organize the scripts based on where the model exists and make sure the appropriate configuration file version is called as part of the execution process.<\/P>\n
Can This Help Improve My Testing?<\/H2>\n
As part of the default example scripts provided in the manual, there is a “Pause” command at the conclusion of the execution section (“Do not edit anything below this line”). By replacing that “Pause” command with an ‘if’ statement and including a definition around whether or not you desire the “Pause” script command to be in effect, you can easily have your scripts in “debug” mode or “production run” mode. <\/P>\n
First, replace that “pause” in the execution section of the script with a line that says,<\/P>\n
<\/span><\/P>\n<\/P>\n
<\/P>\n
Then, you can control this behavior from the configuration file instead of within each script. Add a couple of lines to the configuration file and comment out the state you don’t want (below shows “debug mode” – pause set TRUE). <\/P>\n
<\/span><\/P>\n<\/P>\n
<\/P>\n
Now I’m sure you’re wondering, “Are there more things I can do to streamline my scripts?” The answer is YES. But, those are for you to noodle on and figure out, depending on the needs of your organization. Happy noodling!<\/P>\n
What do you think about AnaplanConnect? Let us know in the comments below. <\/STRONG><\/P>\n
\n<\/span>Master Anaplanner Stacey Gibbens<\/A>, PMP is a Senior Financial Systems Analyst with Simon Property Group. In this role, Stacey manages a suite of financial applications (including Anaplan), wearing any one of several hats depending on the situation and customer in question. This includes project management, application development, systems integrations, and expert-level troubleshooting. <\/P>\nStacey understands that any information system is only as good as its user interfaces and data flows. Since implementation in 2015, the footprint of Simon’s Anaplan environment has grown from one production workspace comprised of a Data HUB, a Security model, and 5 user models to FOUR production workspaces, comprised of two Data HUBs, a Security model, and 14 user models.<\/P>\n
She and her team have been able to leverage the straightforward Anaplan user interfaces, along with AnaplanConnect, scheduling tools, and a data warehouse, to reduce errors and eliminate duplicative data entry between multiple related (but stand-alone) applications as well as produce external, highly formatted Cognos reporting.<\/P>","format":"html","dateInserted":"2020-04-16T09:27:31+00:00","insertUser":{"userID":200,"name":"Stacey_Gibbens","url":"https:\/\/community.anaplan.com\/profile\/Stacey_Gibbens","photoUrl":"https:\/\/us.v-cdn.net\/6037036\/av\/200.jpeg","dateLastActive":"2023-07-12T20:08:06+00:00","banned":0,"punished":0,"private":false,"label":"
 "},"displayOptions":{"showUserLabel":false,"showCompactUserInfo":true,"showDiscussionLink":true,"showPostLink":true,"showCategoryLink":false,"renderFullContent":false,"expandByDefault":false},"url":"https:\/\/community.anaplan.com\/discussion\/67536\/tips-for-large-script-implementations-using-anaplanconnect-1-4-x","embedType":"quote","name":"Tips for Large Script Implementations Using AnaplanConnect 1.4.x","embedStyle":"rich_embed_card"}">
https://community.anaplan.com/discussion/67536/tips-for-large-script-implementations-using-anaplanconnect-1-4-x
"},"displayOptions":{"showUserLabel":false,"showCompactUserInfo":true,"showDiscussionLink":true,"showPostLink":true,"showCategoryLink":false,"renderFullContent":false,"expandByDefault":false},"url":"https:\/\/community.anaplan.com\/discussion\/67536\/tips-for-large-script-implementations-using-anaplanconnect-1-4-x","embedType":"quote","name":"Tips for Large Script Implementations Using AnaplanConnect 1.4.x","embedStyle":"rich_embed_card"}">
https://community.anaplan.com/discussion/67536/tips-for-large-script-implementations-using-anaplanconnect-1-4-x
Good article!
Stacey3 -
Thanks@Stacey_Gibbensfor your thoughtful comments and recommendation to run as administrator.
1 -
QuinE Thanks alot
1