Community perspective: Automate List Nodes Selective Access


Consider the following situation:
There are times when we need to enable selective access for flat list nodes. Although Anaplan has native Users settings tab to manage list nodes access but if the number of list items are huge then managing the security using Users settings tab becomes challenging.
This article will cover :
1)How we can manage user security using an automated custom rule.
For example consider that our organization has following hierarchy.

And we have a List‘Plan Hierarchy Flat’我们在哪里存储所有n列表吗odes in flat manner without creating the parent child relationship. We have enabled selective access for the hierarchy as well as for the flat list nodes. We want to manage the selective access for the flat list nodes based on the access assigned at the hierarchy level nodes. Meaning, if a user is assigned an access for Plan Hierarchy Level 1-> Node 1 then he should have access to all the Plan Hierarchy Level 2/ Plan Hierarchy Level 3/ Plan Hierarchy Level 4/ Plan Hierarchy Level 5/ Plan Hierarchy Level 6 nodes in the flat list which rolls up to Plan Hierarchy Level 1-> Node 1 in the PLANNED hierarchy.
SOLUTION
One possible solution is to use a custom interface/rule to identify the list nodes in the ‘Plan Hierarchy Flat’ list where selective access needs to be applied for the concerned user; and then build an automated import from these custom modules to the Users settings tab to manage access in more efficient manner. The following steps can be used to achieve this functionality.
Step 1:Create an input module with following dimensionality to maintain hierarchy node for access input for the concerned user.

Step 2:Create a system module to map the flat list nodes with the planned hierarchy nodes.

Step 3:Create the logic to derive the access for flat list nodes based on the access input maintained for the main hierarchy nodes as below.

NOTE:This logic will ensure that we identify the nodes in ‘Plan Hierarchy Flat’ list for access assignment to concerned users based on the inputs maintained in module created in step 1.
Step 4:Create a Calculation module to identify the sales hierarchy nodes name based on the user access input maintained in the input module created in step 1.

Step 5:Create a saved view in the calculation module to prepare the view to import the user access settings from calculation module to Anaplan’s users settings tab.

Step 6:Create a calculation module to clean up the existing selective access assignment from Anaplan Users settings tab before new import so that we do not have obsolete nodes assigned to the users if access assignment has changed.

Step 7:Create a saved view in the calculation module to prepare the view to import the user access settings for cleaning up the old assignments before a new import.

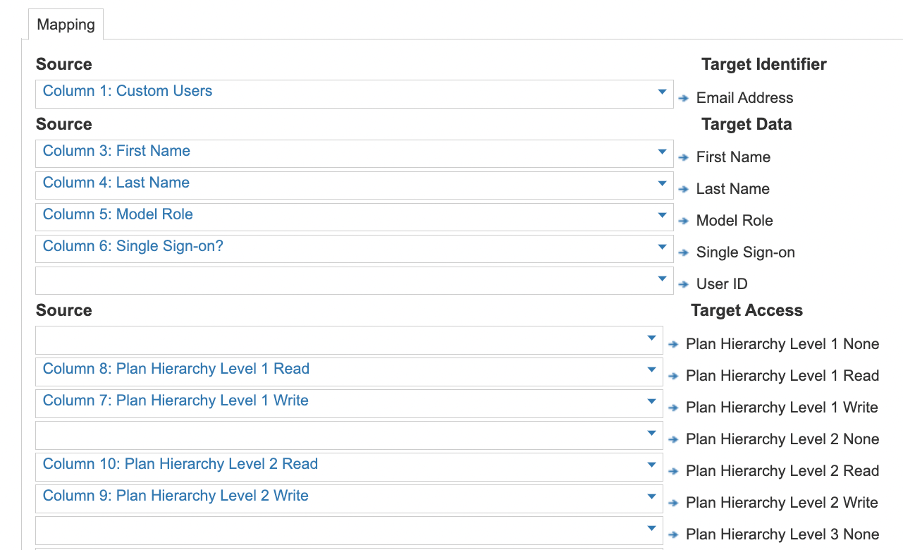
Step 8:Create an import from saved view created in step 7 into users settings tab with following mappings.

NOTE:This import will wipe out old assignments from Users Settings tab before a fresh import for the latest access assignments.
Step 9:Create an import from saved view created in step 5 into users settings tab with following mappings
Conclusion
This approach can be extended to manage the selective access assignments for the lists where the number of list items are high and we are able to clearly identify an automated rule/logic which can help us reduce the number of entries that we need to maintain manually for managing the access assignments. This approach can also be extended to the scenarios where we want to manage the security through a centralized application for all the different models that we have in our current system landscape.